Tuesday, March 13, 2018

Monday Night Train Night

 Well, the turnouts are in but now we have to make a transition from the escape turnout, down a hill to the yard level. You can see the turnout past my elbow where we have no track yet attached as we have about 5/16ths of height difference in the road bed between the main and the yard. So, we need to make a transition.
 So, a visiting friend, Dan, was tasked with making that transition during the train night. It took him a lot of card stock but he did it over a distance of 30 inches and on a curve. Good Job, Dan!!
 The rest of the gang was primarily working on incorporating a hatch into the scenery around the back of the big hill. Jim, a friend from the Baltimore area, was visiting to get some ideas for his new layout and was supervising.
 The fellows are working with cardboard to do a mock up of what we need.
 Meanwhile, Alan was patiently painting and coating plaster shoulders in the Snyderstown area.
 Later, after things quieted down, I went in and used what the guys had done to lay out a plywood lined hatch.
 The hatch sides mimic the roll of the hill side.
 This will allow me to get to an area that would be inaccessible once the scenery is all in. I used 1/2 inch plywood as the sides. The cover will be made of expanded foam with a plaster coating.
 I believe I will have to make the hatch top before I finish the plaster scenery so I can make it match. It would be difficult to do if the plaster is on the hill side.
This is the view from the other end of the curve. The cardboard line is the top of the declining hill.

Finishing The East End Turnouts


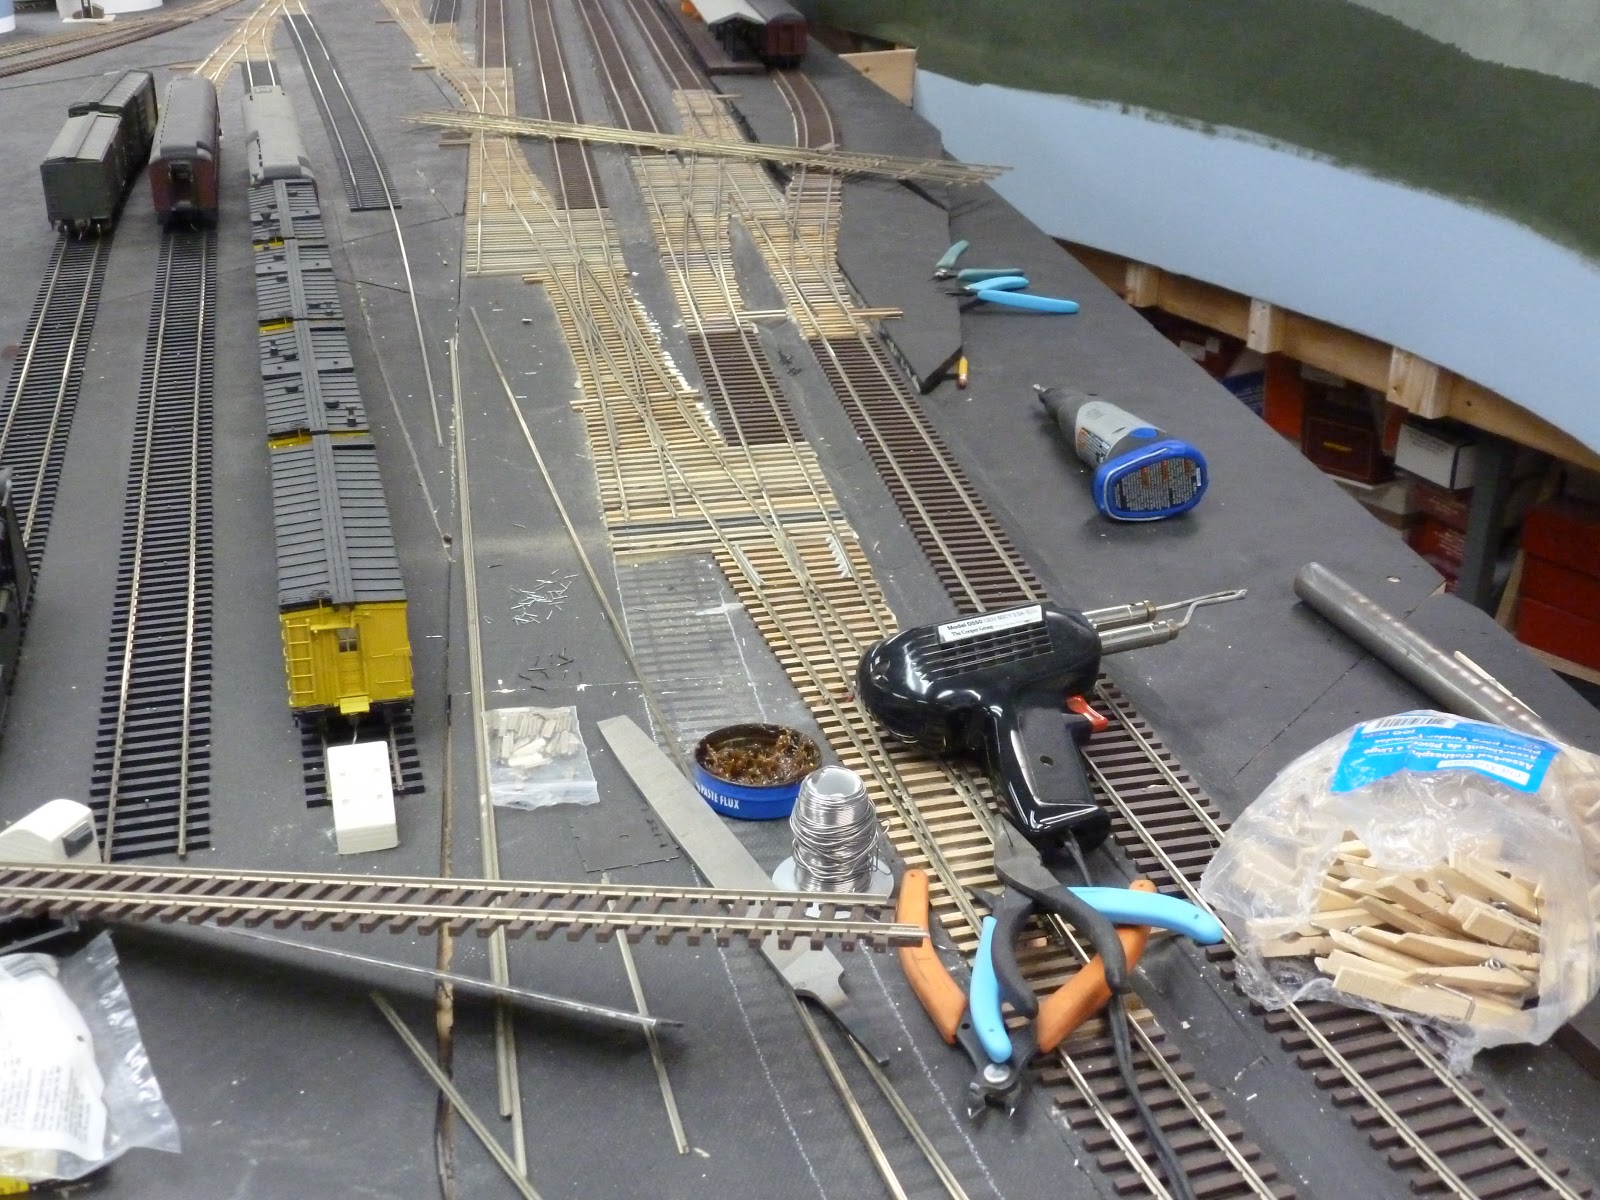
 Well, the double slip is in and now we have to lay another three turnouts on curves to tie in the Arrival/Departure tracks and a caboose track
 The caboose track will go off to the left where you see the code 125 rail coming up. We also have to tie into the track to the right of that. It is the alternate lead to the Arrival track.
 Looking back, I have laid two curved turnouts to both tie that Arrival track in and to put in an escape track to the turntable.
 First we use the turnout template to determine what size frog I need to smoothly tie in the caboose track. It turns out that a number 8 will flow well with the leads.
 I used a curve template to be sure that the minimum radius was maintained. I use 62 inches as a minimum. I also located the switch motor hole with the diagram. You can see the hole in the paper.
 Ties are now glued down after I located and drilled the hole for the switch machine. I used the turnout template to do that. I use the steel rod and bar to hold the ties down while the glue sets.
 An overhead view of the process.
 I used the straight edge under the paper to give me a straight line template for the ties.
 Then we have to sand the ties before starting to lay rails.
 These are the leads into the Arrival tracks.
 I laid a piece of flex track over the ties to be sure it flowed well.
 Now I begin to lay the rail. The outer running rails go first. The frog is set based on the template.
 Starting to put basic spikes in to hold the general shape of the turnout.
 Frog goes pretty smoothly into place.
 More rails added. I am building the turnout in Code 148 to match the main line. I will transition to Code 125 as we go into the yard about a foot down from the turnout.
 Guard rails are in and the points are being bent to match the gauge.

 Turnout is almost complete.
 Now I have to accommodate the existing track and make the transition joint.
 Ties are now trimmed and the turnout is essentially complete.
 The throat is now almost done. I will finish the track and add the motor shortly.  Everything will blend in color as I paint the track work.

Monday, February 5, 2018

Laying in the New Double Slip

 Here you can see the new turnout laying on top of the ties and adjacent rail. I have to trim the rails and some PC ties to get it to fit. I have had this new turnout for over a year and have not been pressed to do this as the other switch worked okay but I felt this would be an improvement.
 Here you can see the gaps with the ties that I will fill in as the turnout becomes more set. I am also using the flex track to absorb the difference in angle to keep the trackwork smooth.
 The opposite end of the turnout with the same problem - need to cut the rails to make the joints.
 Here is the tentative set of the whole turnout.
 Jack Brown is working as the top man as I am under the layout pushing the actuating rods from the switch motors up through the deck.  We had major problems with the stiffness of the throws. I used dry graphite as a lubricant and finally had to go to heavier piano wire to get the point to throw over.  I am a little concerned about that but think they will break in with use.
Here is the finished installation. Now I have to complete the leads to the turnout. More on that next.

Adding Switchwork at the East End of the Yard

 Well, Jim Mucka came down from Pennsylvania for a couple of days of layout theory and also hands on track work. So, we began to install turnouts on the east end of the yard. The one he is laying the ties for is to take an engine to the engine house off the Arrival track.
 He is using a straight edge to keep the ties aligned in a tangent off the diverging track. Takes time but makes a big difference. Actually makes the tie laying easier.
 Here is the completed turnout, less the point bar. I had previously sanded the ties after the glue dried and then I placed the components down. I use ROW cast frogs and points so the turnout construction goes a little bit faster. This is a number 7.
 That turnout previously laid goes into another turnout for the switch lead for the yard.
 Coming through that one, we head down the track towards the entrance to the arrival and departure tracks.
 We have a double slip at that throat. I am going to replace this double slip with another that has a higher frog number as I think that will enhance the track work. This is a bit problematic as I have to lift the existing turnout while saving as many ties as I can.
 In my usual haphazard fashion I have gathered the tools and they become spread out as I use them.  The work train is parked on the adjacent siding though.
 Looking out further, you can see the overall ladder that I am trying to finish up. This area has a combination of Code 148 and Code 125 track. Main is the Code 148 and the yard is Code 125.
 The new double slip is sitting in the area as I size up the nature of our problem. We will have to excise a lot of ties and also build up the PC Board ties top match the remaining ties and Atlas track.
 This is a poor shot of the removed double slip. It took me about an hour to carefully remove it. Those are my O scale scissors in the shot also.
Finally I can rest the new turnout on the ties before I begin the installation process.

Visit From the Board of Directors

 Well, Christmas was very busy for us with the grandchildren coming. We had many small operators as you can see.
 The stools were flying around so they could get up to see the trains better. I had to grab some quick photos as the action was fast paced and Grandpa had to keep a handle on what was moving!

We got the general seal of approval but this granddaughter was a bit dubious about the whole affair!