Sunday, January 24, 2021

Another Visit by The Layout Elves - A section of backdrop added

Well, I was surprised last week by a visit from my grandsons and my son in law, Jason, to work on a couple of projects.
The first project was to cover most, but not all, of the doorway at the end of the loop leading up the branch. I did not want to cover the whole door as I want to be able to look at the length of the layout from that vantage point. I will cover the top of the door with a drape if I have to. 
Dylan is using an air hammer to nail a Masonite sheet to the frame that we made. You can see that about a foot of the door opening is exposed. 
Here are two views of the finished product. 
Then they shifted to the second project - building the base for the town of Milton which has been awaiting this for about 8 years. First, we had to remove the temporary flooring I had placed there to allow us to raise the wall next to Dylan some years back. 
Some tool adjustments were required
But they got it all up.
Here is the intrepid crew before we laid the new deck. It is cut and down. We even cut up one sheet of Homasote to partially cover it. I have to buy another sheet to finish it. I can't wait for them to come back as we have some more work to get Milton in shape. My biggest problem now is that I am absorbing my horizontal surfaces and have no place to put things. 
After they left, I filled the nail holes and painted the view block blue,
Then Paul came by and we put up a photo I had Backdrop Junction make for me for this space. I have had it about 2 years - letting the idea marinate for a while. It's perspective is a little further away than the photos on each side but I think we can mask the transition with trees. The new photo has more haze than the other ones. I might also add some dry brushed white on the existing photos.
This is how it looks from a distance. Not too bad. I cut the photo down on the left end and added a section of a distant hill to match the photo on that side. Seems to fit well.


A closer shot. 
And the completed project awaiting those trees. I think it does the job!
 

Sunday, January 3, 2021

Adding the Scenery to the Area

Well, we had a quiet Christmas with just one of our families visiting. They were anxious to work on the layout so, I took them up on their offer. Ian and Dylan were able to climb around on the river. Jason, their dad, did the honors of painting on the glue and supervising the work. They did a terrific job spreading the super turf for a finished look.
Ian is focused on the far bank and Dylan is working on the tunnel portal area. 
You can see the whole crew as they work in conjunction. The boys are pressing their dad to go faster with the glue! They got the whole area done in about 1.5 hours. Pretty good. Now Grandpa has to build the arch bridge to get us ready to actually pour the river.
 

Tying in the Portal and Tunnel Walls

Well, we completed the plaster and basic ground cover but now have to bring the ground to the portal. I used so Hock stone wall material to make the tunnel liner. I weathered it to match somewhat the color of the portal. It is then glued to a cardboard backer and placed along the tracks. I sealed the bottom and then brought the ballast out to cover the seam. I assume that once the area is covered, you will not see the end of the wall so easily. I did not want to go too far in case of unforeseen events. 
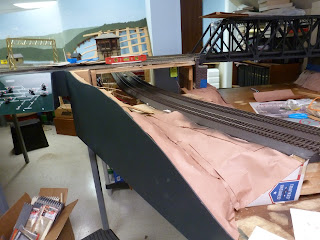
Here is a view from overhead. All this will be covered with plaster. So, I need to protect the track during construction. 
I built a webbing over the track and holding the upper portion of the liner walls in place. 
I glued paper to that webbing. I stuffed the tunnel with paper towels to be sure no plaster or water got to the track. That was successful.
Now I added webbing and paper to make the final land form transitioning from the upper track to the lower track. Tape has been added to protect the color of the portal and walls.
The paper has been brought down the side to the face of the tunnel portal. 
Plaster cloth has now been added. It was careful work to tie to the face of the portal and wind wall.
Completed view and Structolite has been added to the plaster base. 
Ground paint has been added to complete the basic construction.
 

Working on the Land Form

We are starting to add plaster cloth, working from beneath the bridge in another room. Cloth is up on the left side
Both banks completed so I can now go back in the main room. 
Coming along the river, you can see the tunnel portal and wall above the plastering as we put the cloth along the banks.
We have finished the far side of the river and as much of the near side as we can do until we make the tunnel.
It is beginning to look like a river.
The junction of new work and old work. We are adding the Structolite to the left. 
Structolite is completed and the ground color has been added. 
The portal complex has been installed. Paul is adding the basic colors of ground foam before coarse turf is laid. He had to climb into the river to reach the far shore. 
A closer look at the portal with its finished coloring. 
I ballasted the track into the tunnel before we finished installing it. I also added glue strips to he back of the walls so I could add the webbing to it without harming the expanded foam. 
I had to notch the portal to allow trailer trains to go through as it sits on the interior of a curve with super elevation. You can see the white spot from the notch before I painted it.
Looking back the other way, the ground covering is going in. 
Paul is now adding grass coloring to the area.

 Next up, I have to integrate the plaster work around the portal and walls.

Building the Masonry for the Tunnel

Moving to the workbench, I felt I should build the wall complex and paint it before trying to integrate it into the scenery.  I cut the retaining wall at the angles determined on the site where I had mocked everything up. Then I pinned and glued them together, keeping everything straight and plumb. Here I am beginning to put different colors on the stones to get a variegated look.
I am using mixes of acrylic colors I made from umbers, yellow and oxide reds. 
I am into my third color and am trying to tie them all together. It is rather tedious but beginning to look okay. 
This is the complete assembly with the addition of the wing wall. I have more blending to do as the right wall is more red than the rest.
Getting close. I began to do over-sprays with rain brown and then grimy black. We will see how it looks on the layout.
 

Building the Tunnel and River Banks of the Susquehanna

This is going to be a multipart outline as it was a multifacted project. The track through this section has languished for many years as I had to decide how to integrate it into what was already built. I have been also  been put off by the magnitude of the size of the river. It is the big, bare plywood expanse you see in the center of the picture.  Now that we poured Shamokin Creek with no major issues, I began to see how we could do this river. 
The river will really dominate the area but is essential in allowing me to finish this end of the layout. 
So, we began (Paul is essential in this project) by installing the webbing and rosin paper for the river bank in the easier areas. This is the view under the double bridges
Here we are looking at that area from the other side of the bridge. The void in the middle is where we have to build the tunnel opening. 
We pushed on and finished the rosin paper. I removed the temporary arch bridge to allow us to work the paper. I did install cardboard outlines of the retaining wall. 
The paper is finished except around the mouth of the tunnel.
As usual, everything gathers in the riverbed! I used electrical connector boxes to hold up the track as the trains were still running. 
Ready for plaster cloth. 
Now I am mocking up the tunnel portal and retaining wall. I decided to tie the portal to the bridge abutment by u8sing a tall retaining wall. I cut the Scenic Express portal in about 6 pieces to lower it and remove the odd trim pieces that I had never seen on a PRR stone tunnel portal. So, I lowered the top of the head wall of the portal, and lowered the sides as well. I have a low clearance to the overhead track behind the tunnel that I wanted to stay in view. 
This is a somewhat blurry picture of the portal and wall appearance. I will need a wing wall on the left side as well. Second problem is tying in the wall's color to the bridge pier which was installed some years ago. You can see it i a somewhat dark maroon.