Well, Ted Schneff advertised he had a damaged Ultra Model NP car that he would sell. We talked and I decided to buy it, despite a couple of crushed ribs. They are terrific models. When I got the car, I found that all the stirrups, despite being indestructible engineering plastic, had been torn to pieces.
Fortunately, I had a set of the steps from Chooch that matched what Mike at Ultra Models had used for the steps. The mounting holes were in place, so I had any easy time installing new ones, until I came to the ladder corners
As the steps were underneath the ladder mounts, I had to gently pry them up to get the steps in. The paint on the ladders was already damaged from flexing as their mounts were broken too (this car had been through the wringer) so I did not add to my repair load.
Then we came to the broken ribs. You can see that one is completely ripped out and the other was crushed. The resin showed through clearly.
Here we see the step is now in place but I still have to fabricate new ladder mounts.
The brake wheel was broken so I removed it and replaced it later with a Chooch casting.
The paint was chipped all over and the roof grabs were gone
I used the remnants of the grab mounts as drilling guides to replace them with wire.
My amazement continued when I took a close look at the trucks. One truck was an Intermountain but the previous owner had not figured out how to assemble it so put a wire through the bolster and side frame
You can see the wire clearly here
And here. He painted everything a rust color although most trucks are dusty and greasy.
The other truck was a Red Caboose, also very rusty.
So, I assembled a set of Intermountain trucks and used my own machined wheels
I had added a deeper relief in the face to more accurately resemble RR wheels. They are also stainless steel so they are not attracted to magnetic ramps.
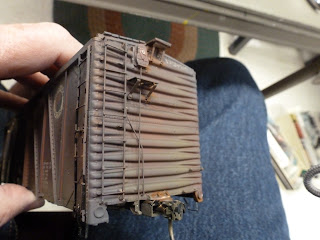
Back to the roof grabs. Holes are now drilled.
Wire grabs added
Now for the touchy part that will make or break our project. I carefully filed the broken rib down until it had a rectangular opening. I pried up the crushed rib to match its previous location. Fortunately, it fit right back in place
I then looked for a matching piece of Evergreen strip to replace the top chord of the rib.
Fortunately, I found I had a 0.060 wide strip that matched the chord perfectly. I added a 0.020 wide piece to the bottom of it to give me the Zee cross section I needed.
Here are the two ribs now in place. I held them there with ACC.
The match looked pretty good. I lightly sanded them to be sure.
The hardest thing about the car was the heavy weathering. I could not use any one paint color to match it. So, I made a palette of burnt sienna, roof red, burnt umber and some grimy black
Using micro brushes, I went around the car and repaired all the scrapes and mars in the paint. The ribs blended pretty well. If I do not point out the damaged area, one will not really see it.
The car is almost layout ready
New brake wheel in place, paint chips covered.
Roof grabs generally okay
Seem to match
Stirrups are a little dark but I could not overcome the black totally.
Ladders are generally blended back.
So, you really can't tell. I used a little chalk to whiten the repaired rib to match the balance of it.
And I have now painted the trucks. I have to clean the treads and paint the wheel faces a greasy black to finish. So, hopefully tomorrow the car joins the roster. I now have another kit of this car to either sell of build. What a choice!