Friday, January 24, 2020

Why we do it - an open house.

 So, last weekend we had an open house for a group of O scale frioneds from Charlottesville, DC, and Baltimore. The weather was brutal with black ice on the highways at daybreak but 10 braved the elements to come down. It was terrific and made the work worthwhile.
 Some were a little worse for wear but all seemed to have a good time. We went over to Ed's after my house and had lunch and then ran his fabulous layout.
 Our work group came and operated my layout. Tim worked hard to keep the branch line running,
 The usual Kibitzers watched the trains going by as they discussed new construction at their houses like at Ted's and soon at Chris'.
But as you can see, the smiles were broad and we all had a good time.

An HO Interlude

 One of the fellows who helps me on the layout is an HO modeler of the Reading and wanted to have a kit of a baggage RPO of that railroad completed. So, after the kit seasoned a while, I squeezed it in while doing the panels. Here it is in primer. It has brass sides, plastic roof and ends and various detail parts.
 The other side. It is a Bethlehem Car Works kit.
 Underside. I had to make some parts to get the trucks to work and also had to modify some parts to make them closer to the prototype.

 Ready to mate to the car.

 Here is the finished product. A nice model although somewhat small for me.
 Brake end
 Other side
Other end with a view of the roof. Back to O Scale!

New Panel at East End of Northumberland

 I have been trying to find a way to have two panels control the same area of the layout - the east end of the yard. The area is so big, no one panel is suitable. One of the group, Alan B., bought some Touch Toggles from Berrett Hill to try and we operated them at his house. They appeared to solve my problem. It allows two panels or more control a turnout motor and indicate on all panels how the turnout is thrown.  So, I contacted them and they were very helpful in helping me pick out what I need. i then drew the above diagram to see what I woudl need and how to lay out the panels.
 This is the future panel at East End that controls the mains and the Arrival and Departure tracks. 
 This is the mid yard panel that controls the yard and Arrival and Departure tracks.

 I had to scale everything out to be sure their toggles would fit. Also, there are touch toggles so you only touch toe panel to make them operate. I had to test to be sure the 1/8 Plexiglas would still allow them to work. They did!
 Transferred the track plan to the Plexiglas
 Painted and drilled the panel.
 Painted the train tracks with white acrylic and added the switches.
Front side as I lettered the panel 
 Testing the visibility of the lights through the acrylic. Not so good.
 So, after this, I realized I had to clear the paint from the area that the LED would shine through.
 Then I could glue the touch pad to the back of the panel.
 The touch pads actually made the panel wiring easier as the turnouts were now all set.
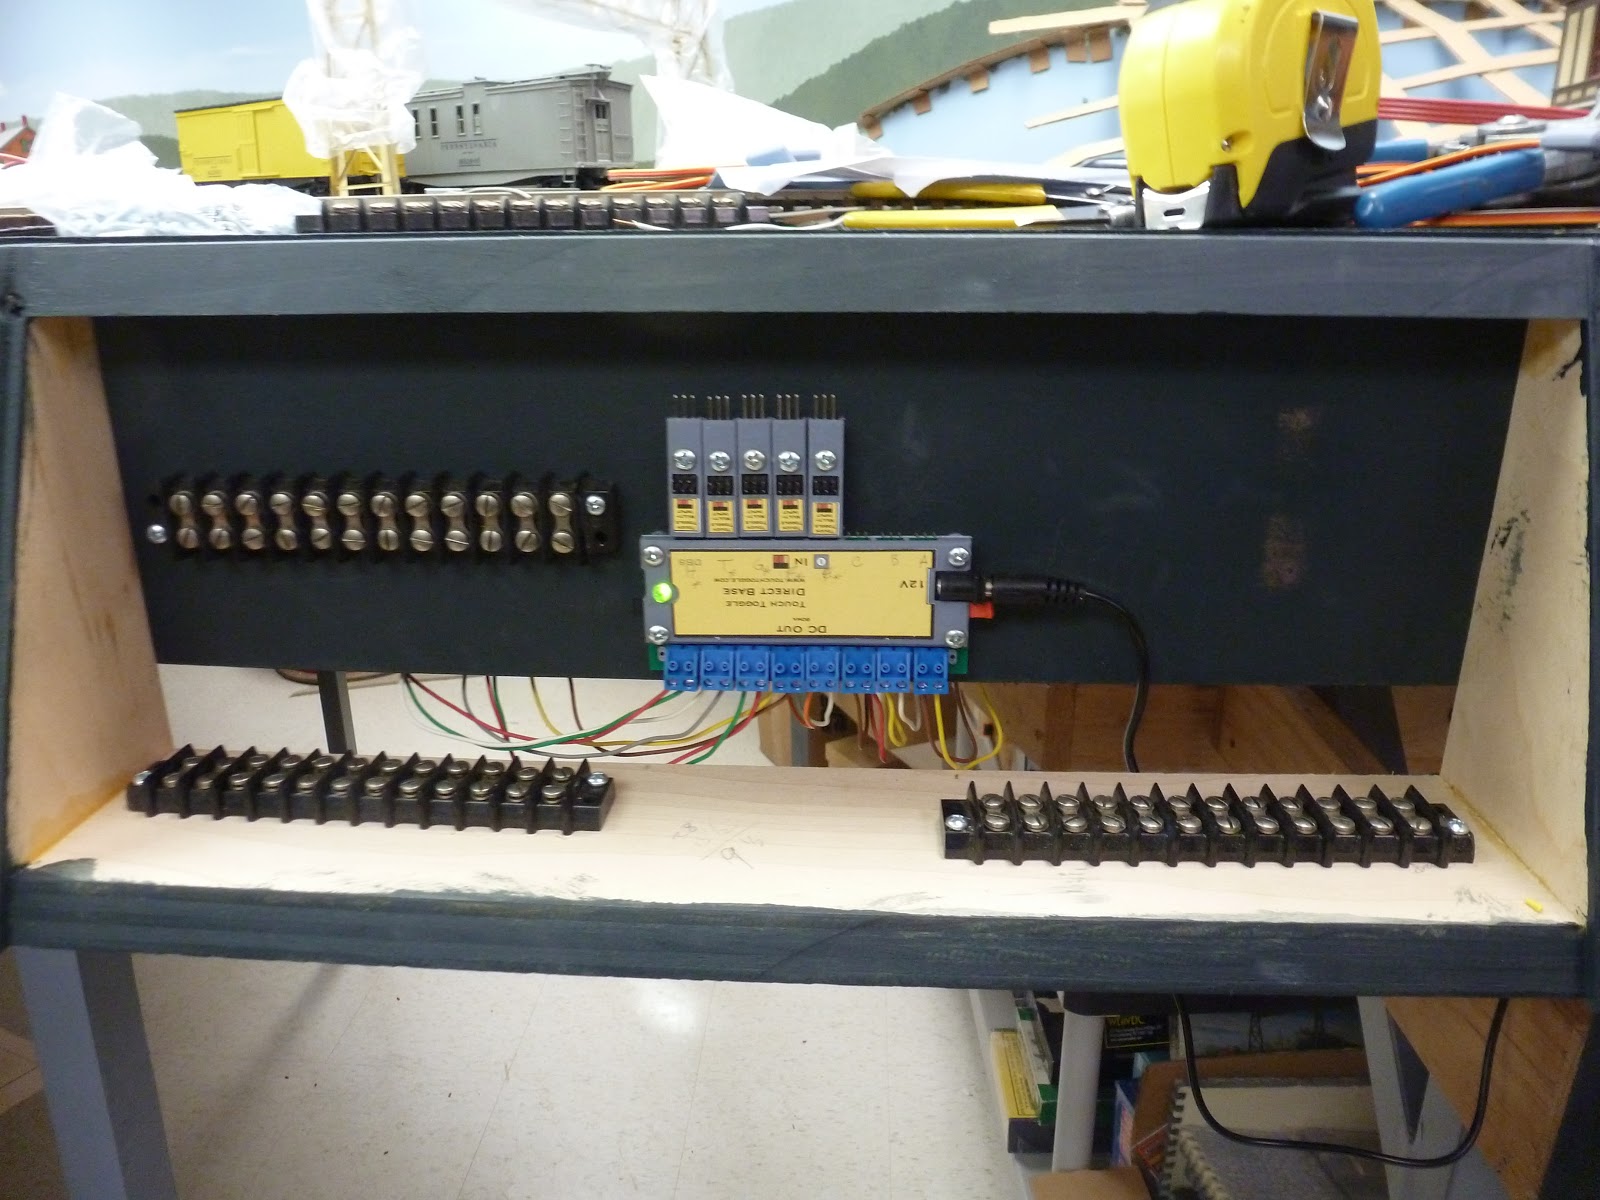
 This is the panel with the terminal strips in place. The blue block is the touch pad control board. My pain began here as I continued to cut my head open working on the wiring.


 Here are the wires for the touch pads awaiting installation.
 Touch pads are now hooked up. Now for the hard part - all the electrical for track power.
 Power wires are now up to the terminal trips.
 I had to run wire to the other panel so that is now in.
 This is the other panel, awaiting a front panel and then the wiring associated with it.
 A working panel with lights. The colors really show now!


I hate to think of going in to diagnose a problem! I do have to organize the wiring now that I have completed it.

Finishing Touches for Sunbury

 Well, it has been a while but I have been very busy with multiple issues. As I looked at Sunbury's photo, it was apparent that there were contemporary autos in the foreground. So, I need some sort of visual block. I figured a fence of some sort would do. I had some surplus stripwood and wood paneling that I could cut up for a 6 foot tall fence that would be along the property line. Here I am staining it with a brown/black mixture. I am using the cloth to rub it down.

 It took a couple of sessions to get the right color so I used a covered plastic container for the job.
 I was cutting the stripwood with a micro cutoff saw.
I used the large ruler as a straight edge to place the panels on the bracing. 
 I ran out of panels and had to go to individual planks for the distant edge of the fence. It would be more rustic as it was going into the woods.
 I used rear bracing to also stand the fence off the photo. It would give me a sense of some distance.
 So, here is the better fence close to the shops. The cars and modern trucks are mostly hidden.
 As we look along the photo, the separation shows up.
 The rustic fence comes into view about 4 feet down the track. The viewer is about 6 feet away.
Here is an overview to give you a sense of the scene.