Saturday, November 28, 2015

Another cabin added

 This was a former PRSL caboose that I got off eBay. I mentioned it in an earlier post where I showed how I sanded off that lettering with a very fine grit sanding stick.
 It had a red roof so I repainted that black while keeping the cupola red. It was just put into revenue service and looks pretty good on an eastbound freight.
 In that earlier post, I showed how I saved the repack data. I covered it up when doing the weathering so it looks like an update after the car was painted.
 Here it is off the trains so you can see the ends. It is an N5b with the higher grabs on the side and comes with a metal roof walk. This car was missing the end bracket so I had to fabricate that as well. I saw another of these models and it too was missing that bracket so seems they had a soldering problem at the station that worked on these cars.
These cars have roller bearings but are heavy and can run poorly. I run them with a dremel and that seems to loosen up the bearings. I am happy how it came out and it makes a good addition.

Thursday, November 26, 2015

N6's are ready for service

 Well, I finally finished what I thought was going to be an easy project to update some N6's and they are ready for service. I took advantage of the football games to glaze and finish them. Here is the line up for the branch.
 I tried to vary them somewhat with the weathering but doing them all together was a bit of a disadvantage in that regard. This car has the number of one of the last N6's in service as it was used on a branch line railroad in NJ.
 I do like the patina you get with the Vallejo Dark Brown Wash. They all look like they are in service for a while.
 I kept the shadow keystone one lighter as it would have been painted in the last two years. I also suffered with some cars having been factory painted so the base color was darker. I had sanded off the lettering as I did not like what came from Precision. Thus the car is darker.
 More of the group. They are the same yet different.
I used the Mt. Vernon Car Shop decals which are such an improvement on even the improved Champs. The car on the left is one I painted about 15 years ago using the Champs. The one on the right is a recent one with Mt. Vernon lettering. You can see how much sharper and finer the lettering is. Plus, he gives you many more regions to hose from. Mine is the Northern Region.

Wednesday, November 25, 2015

More work on the scenic dividers

 Well, last Monday was a work night and we continued with the building of the scenic divider. Paul and I put up framing to hang the sheet rock on as we come down along the yard.
 Using a level to check vertical plumb and level of the top of the wall, we screwed the studs to the side of the band board of the yard deck. We got 16 feet up in the allotted time.
 Here is how it looks from the other end. You can see it is on a broad curve. Soon this view of the yard will be no more! This is actually the easy part.
 Meanwhile Ed and Rich are going to put a piece of sheet rock over that styrene that I put up before. It was too hard to work and did not want to give up the curl that it had from storage. We need to carry the sheet rock one more stud so I can go on from there with the new sheet rock over the Masonite.
 Ed has made a template of the scenery form on the left end so they could cut the piece to conform to that. It came out very well so it will be easy to integrate it into the scenery.  They have the sheet up and are starting to screw it in place. They decided they needed some adhesive on the seam end so they are preparing to  put some in place.
Rich has pulled the end of the sheet out and will put in the adhesive, then screw it down. The hard part is going to be putting up the sheet rock on our hands and knees. More later.

Working on the caboose fleet - N6b's

 Well, we need to expand our caboose fleet as more trains are running on the branch. I purchased some poorly painted N6b's on Ebay some time back. Then I sanded off lettering and/or paint, spot repainted and then relettered with far better material. There are 5 that are in the group that I am finishing up. One is in shadow lettering and the other 4 are in the pre-1954 lettering.
 I have taped the wheel treads to protect from the weathering that I am going to spray on the undersides. I did not care about the color of the undersides as they look the same with the coating of grime they will receive.
I then added Steve Grabowski's PRR lanterns to the bodies. A pain to solder on as they have to be bent to catch the corner. The smoke stacks also will be painted with a steel color. I will then put a dark brown wash on the cars and top it off with a grime overspray. These cars are at the end of their service lives so will not be too clean. More pictures as they go on the layout after all the weathering and then the glazing.

Wednesday, November 11, 2015

Open House

 Well, we had an open house that I have spent the past 3 months getting ready for. A total of about 21 fellows came from as far away as Buffalo and Gettysburg. Most were from the Washington DC area and were part of our old Friday night gang. Here we see Rich Randall operating one of the main lines and concerned that he is controlling two trains at once. He came down with Art Selby who is one of the longer serving members of the group.
 Looking across the benchwork (a view soon to be gone as I put up more view blocks) you can see close inspection of the engines and turntable by Andrew Dodge, Chris Smith and John Sethian. I get a lot of good suggestions from the fellows who all have skills in different areas. It is a very productive visit from my perspective!
 Chris and John seem to have found something! I have to go over and check what I missed.
 Peter Gentieu had a fun time operating the branch line and ran many trains up and down. Here he is up on a stool checking out the yarding of a train in the holding loop at Mt. Carmel.
 Discussions took place all around the room. Ed Rappe is expounding on a subject with Ray Grant and others. Can't tell what it is but he might be talking about the merits of DCC versus my standard DC and block control. We talk about that a lot!
Here is most of the gang at the end of the visit. This was the end of a long day for many as they had left the NOVA area about 7 am and driven down to see Ed's and my layouts. Now they face a long and rainy drive back north. We do this every November and it is really a fun time for us to show everyone what we have accomplished in the past year.

Tuesday, September 29, 2015

West End panel - KS Tower

 Well, during all the plastering and wall construction, I have slowly been building a panel to control the west end of the yard and associated main line. On the PRR, it was called KS Tower
 Using the technique of painting Plexiglass on the back side, I used the track diagram you saw in an earlier post, and drilled holes for the various switches and then painted the green background.
You can see that I painted the white for the track lines last and then added the various switches.
Here am I in a pose that I will hold for many hours as the wiring is tedious and exacting. The terminal strip that I am attaching to is forward of my knees on the bench work framing. More on this project later.

Erecting the backdrop behind Milton and the curve.

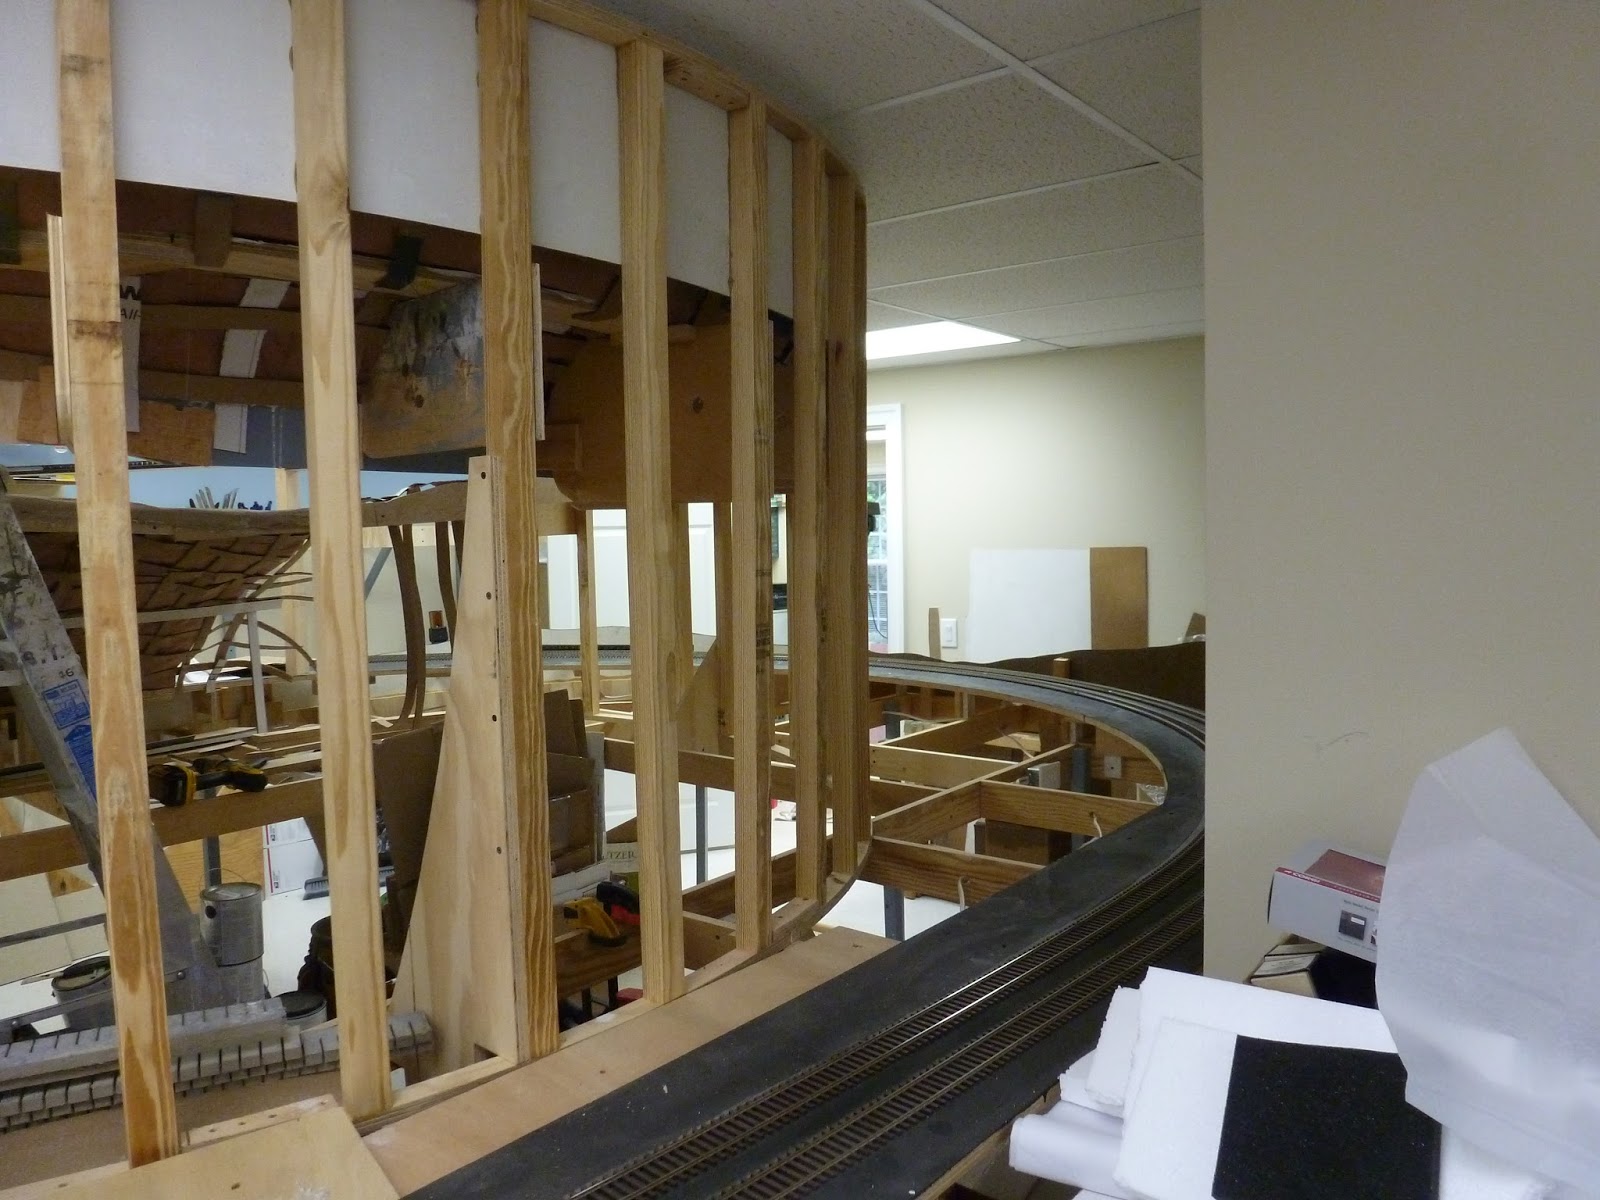
 Well, this stud wall that holds up the branch to Mount Carmel has been staring at me for quite a  while and I have been trying to think about what to do with it to give me the best backdrop. You can see the branch line substructure on the upper right of the picture.
 I have some sheet plastic but that is too inflexible to work with. Masonite is too porous for my purposes. I have been thinking that I would go with a Masonite sub structure and then a plastic top sheath.
 You can see that the wall is curved so the backdrop material will have to have some flexibility. It goes around a big curve on one end and a short curve on the other. The radius is about 60 inches.
 The area in the foreground will become Milton with some switching and a small town to be built. I have to fabricate the substructure after I get the backdrop up. In the picture below you can see that I will have to remove some angular reinforcers that I put up when I built the wall. They will interfere with the installation of the backdrop.
 Well, the angular legs are gone and I added brackets inside the structure of the wall. It is now very rigid.
 Here is the end of the wall where it meets the branch coming across a bridge over the aisle. After a lot of internet searching, I came up with using 1/4 inch sheet rock, including a flexible variant of it. I was able to buy it about 30 miles away and purchased two sheets of each.
 Well, the work gang came over after I had prepared the structure and we began to hang the sheet rock. We used the normal sheets for the straight section, about 16 feet long by 4 feet high. Then we got to the curved portion. We learned that water was required to be sprayed on the back of the flexible sheets. You had to let it soak a bit and then carefully bend it around the structure. Here we see Paul and Alan up on the bench work, finishing the last straight piece. Jack is providing logistical support.
 Jack is now going up to add screws to previously installed pieces. You can look over his head to see the sheets already up.We left the last inversely curved piece to the end.
 Now, the pontificator has entered the picture as we debate the best way to secure the end of the first curved piece. It is decided to put a piece of plywood to hold it down to the framing and relieve the stress of beginning the curve.
 Paul is not convinced but agrees to go along with the plan as he can say "I cannot see it from my house" to quote my good friend Stan Kos.
 So, now I have put up the plywood scab to secure the joint and am now slowly screwing in the sheet as Alan bends it from behind. According to the literature, once the sheet rock dries, it will take a set to match the curve and stresses will be gone. Paul is still not entirely convinced.
 Here is a view from the other side as Alan holds the sheet rock, while still spraying more water on the back side of it. I am screwing the sheet every 8 inches to a vertical stud.
 After the dust settled, literally, we added to last sheet on the inverse curve and we are now up to having to mud this wall. You can see the water bottle used to spray the back side.
 Here we are looking down the main line by Milton and the start of the big curve.
 Here is the curve. It has a 4 foot high section that is 4 feet long. Then it shrinks to a 2 foot section that is 8 feet long. There will be a  hillside here that goes around to the base of the bridge and meets the hill we have already built.
This is the other end that is 2 feet high. It will have a hillside coming up to meet the sheet rock. You might be able to make out the end of the line up to Mt. Carmel in the far right of the picture. i have to cut off the tag end of the sheet rock to the right of the line of screws.

In summary, I am pleased with the results of the installation. I think it is easier than a combination of Masonite and plastic sheet. So, now I have to evaluate how to accomplish this on the balance of the scenic divider that has to be built - about 90 feet or so. More trips to Hampton for supplies.

Covering that hillside

 So, in a two step process, we covered the paper first with plaster cloth and then with Structolite. The Structolite has a brown color so I am a bit ahead in covering the hillside with texture.
 As you look down the long view, you can see the effect of the track climbing up the hill to the yard in Northumberland.
This is end of the current construction. I have to build up the hillside to incorporate the bridge structure that will span the aisle. I am only in the drawing stages on that.
 Looking back, you can see the hatch that covers the open area in the loop of the track work. That wooden trim will be painted a dark green to blend into the trees that will come.
 Looking across the hatch opening. That is the branch leading to Mt. Carmel in the rear.
 Another view of the curve around the open area
 The next step will be to weave the webbing into the shape of the hillside under the bridge.
Here is the whole view looking back up the hill. I will do the structure from the track to the fascia in the next month.