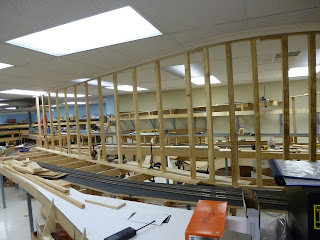
I have to make the wall start in a way that allows me to use two bridges to cross the aisle and tracks of the main line. A bump out, shown by the piece held by the clamp on the right side of the roadbed where it comes off the wall and crosses the aisle, will be constructed to pick up the pier holding the right side of the bridge. The through truss bridge will go 40 inches to a pier on the left side of the main line. We will then have a 20 inch deck girder to make the transition to the hillside. A curved backdrop/wall will then carry the line up to the ceiling.
 |
| A friend of mine, Walt Johnson, is putting in a stud. |
We started the wall by building the curved sections on the floor and then raising them up to the bench work. We have about 2 inches of clearance to the ceiling. The second purpose of the wall is to avoid having anyone seeing the other side of the room. At this height we can be sure we will not have that happening. A train climbing up the wall will be low enough that it will not be seen by people on the other side of the wall

Walt is looking at the bottom of the curved section as we decide where we are going to cut it to begin the straight section to run down the length of the main to the hidden section.Over his shoulder you can see the bridging piece of benchwork that is going to be picked up by the wall we are building. I am having a little problem as the wall is not plumb yet so we have to add braces to make it plumb.
We now have the straight sections up and are looking down to the overhead track. You can see the end of the curved wall. . In the distance, the wall will turn radically left to cover the opening for the lower hidden tracks. I can now put in the bracing on the wall to hold it plumb as I build the roadbed on the other side.


