Saturday, June 18, 2011

Sheathing the yard.


So, after a quick trip to Home Depot, it took six sheets of cabinet grade plywood to put the base on the box framing. I left a long tongue sticking out as the basis for the start of the grade down to Milton. My next step will be to go back to Milton and build the sub roadbed base there. You can see that area in the first picture to the left of the door. The grade will start up there and go to the upper yard. The pieces of plywood are resting on the framing along the wall where it will make its U turn to go back to the upper yard.


I have to find a special lumber yard in another town to buy the homasote to cover the yard so I can start laying track.




A surprise visitor


As I am working away, who should show up but my grand daughter Rose. She really wanted to operate a train so we had to stop and let her man the controls . You can see she really enjoyed herself.

Too bad she cannot weild a hammer!


Finishing the challenge - Part 3


So, here we are trying to end the yard framing with a flexible piece of plywood hanging out in mid air.


What I did was to place a strong piece of wood under the benchwork for the branch line and clamp it in place. I then hung a piece of 2x4 that I ripped in half from that piece with a clamp/ Then I clamped the flexible plywood to the vertical piece.


You can see this in the first two pictures.


It gives you a good idea of how everything was hanging out in space. Needless to say, we had a few hickups with this Rube Goldberg contraption.


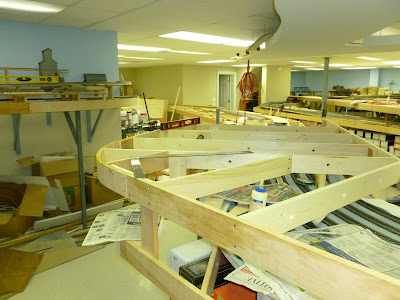
The last series of shots show how the bench work came out.


One last point that I should make. The rear of the framing had a long span to cover as it crossed over the lower yard throat. In order to broidge this, i ripped two 1X4' s from a piece of furniture grade plywood. Then I screwed and glued them togeteher, essentially creating a 1.5 X4 piece of wood that was pretty strong. You can see it in the last two shots on the left side of the framing of the upper yard.


In the last shots you can see how the curved benchwork came out as the aisle goes back around the yard.


Taking a break from the upper yard


As I finish the framing up above, I have to get the turnout wiring done and the blocks cut below as it will not be convenient to do this later.

Thus, I have drilled the roadbed to accept the drops from the turnouts. I am using Atlas turnouts but do not trust their wiring to go the distance. So, I am adding feeders to each rail section and the frog.


I am also insulating my block cuts with yellow styrene.

These will then be coated with epoxy and ground to match the profile of the rail. Once this is done, I can finish the wood work above.


Engineering challenge - upper yard - Part 2


This will be a little tough to follow as I messed up the picture sequence but here goes-
In the fourth picture, you will see that I put up the back member of the framing for the next section of benchwork. Then I suspended several long boards from it to carry the load of the front member of the box framing. The front member has a 1X4 straight piece and two curved pieces of flexible plywood. So, I have to place the straight 1X4 in place so I can set the flexible pieces and tie in the cross pieces.

The fifth picture shows the front 1X4 resting on the temporary support as I align it so the curved portion flows smoothly. I am trying to maintain a 36 inch wide aisle and I have a curved outer portion hanging on the wall here.

The first and second pictures show the board after I have dadoed it to accept the curved plywood at the joint. I also have placed a board at the front of the benchwork section to show me the 36 inch limit point of the curving section of benchwork.


The third picture shows that I have placed the first curved section in place and put in the cross members to stabilize everything.
This was the easier section as it had straight pieces of 1x4 on each end.


Completing the upper yard subroadbed - Part 1


Well, some months ago we left off building the upper yard until we could finish the lower storage yard. It is now done and I have to get back to framing and sheathing the upper yard area. This is going to be a bit of an engineering challenge as I am directly over the lower 8 track yard.


In the first shot, I raised the side member of the extension with dadoed ends to accept the flexible plywood that will form the curves.


In the second shot, I have started making the first curved corner that will have the yard doubling back on itself.


The last shot shows the corner in place and the cross members up, complete with the risers that support it off of the framing of the lower storage yard.


The challenge still faces us as we have to form a corner with no structure to support the various members.