Wednesday, July 14, 2010

Continuing the Branch - up to Shamokin


Even as we work on Herndon, we have to get that branch to climb up to the overhead storage loop. In the second photo you can see the existing end of the line coming around the corner at an elevation of about 67 inches. That is just about even with Rich's head as seen in the first photo. He is placing the verticals on the wall that we will use to hang the 2 foot wide benchwork off the wall. I have set them even with the existing roadbed as that will rise significantly over its length. The line will climb up from 67 inches off the floor to about 73 inches along the wall (about 2.5% grade requiring the helpers) and then turn to the right and come over the
top of the aisle and then turn back to return , climbing up the center of the room until it reaches the overhead loop at 80 inches of elevation.
We will feature the Glenburne Colliery along this section of the wall. I plan about 3 siding tracks with the building along the wall. The conveyers passed over the main line so we will try to represent that as well. This mine was just before you came into Shamokin, PA. We will just have a representation of Shamokin on the right side of the room where the line turns back. The turn to the right will begin at the end of the supports that are on the wall in the third photo. Another engineering challenge is to get this supported without interfering with the aisle and the mainline that will go below it in the area of the saw horses.
It will also be a challenge to operate on this section as the track is at eye level for me and over the head of some (Rich and others). So, I need to build some sort of scaffolding that he can walk on yet I can push it out of the way when walking through there.
I cannot complete this though, until I build the main yard of Northumberland as I need the space in the center of the room to use my saw in building the main yard. So, that will be the focus of our next major construction phase when I return from a family gathering. Thus, the engineering will be given time for reflection.


Starting the hidden yard


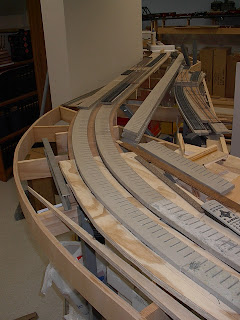
Later that day, we were able to build the throat and lay one section on each of the eight yard tracks. This gives you a view of how the yard opens up. In the first photo, you see that the yard will go into a curve right after the throat. We are just squeezing everything in, with a minimum radius of 62 inches on the interior track and maximum radius of 90 inches on the outer most track.
The track will come out of a tunnel where the roadbed changes from grey to black. We are using Atlas number 7.5 turnouts as large engines will have to go into the various tracks. They certainly take a lot of room but that is the price you pay. Each holding track will hold about 35 cars plus an engine. This should give us some operating flexibility.

Finishing grading the Main in Herndon


Rich came over and gave me a hand in finshing the plastering of the ballast shoulders for the main through Herndon. We gave it two coats of spackle to handle the shrinkage and then Rich smoothed the dried compound with a wet sponge and spackle knife. Now we are painting the roadbed flat black to simulate the cinder under layer below the ballast. We will not ballast until I have painted the track and put down the scenery layer. We do not want to foul the ballast with plaster from that action. I still have to lay the sidings in Herndon but will do that next month. I can build the main through town so we can move towards getting something running.
In the last two shots, we closed out the work session with laying out the 8 track hidden storage yard that will be covered by the main yard. The two Rich's are pinning the switches in place as we get the general format set. I have already drawn the 8 radii for the tracks around the curve. Rich and I set the easements into the curves and now we are going to lay the throat.


Sunday, July 11, 2010

Preparing the next hidden area


Well, this gives you a view of the overhead area with the side rails (it is now ceiling white as I just finished painting it - 2 coats). Those pieces you see on top of the side rail are extras to allow me to continue the side rail once I get the loop hooked into the line coming up the grade.
Below is the next hidden area to be built. It will have 8 tracks but they are separated into 4 east bound and 4 west bound. We will be starting on the eastern end up by Herndon where you saw the turnouts laid out on a trial basis. The first picture is the area where we will start. It should go quickly as everything is prefab (or so I hope).


Reusing a turnout or two


Well, here you see the process used to save a turnout from an old layout. These had steel rail and Harry Roberts frogs cast in Pewter, along with home made points. We salvaged them by lifting the homasote up off the plywood without destroying the turnout.
I wanted to make them suitable for DCC should I ever go that way. So, I upgraded them with Lou Cross cast nickel silver frogs and then stripped out the steel rail and replaced it with Lou's nickel silver rail. In the last photo you can see the switch has only a frog and the rails have been pulled out. I slid them out so that the spikes would regauge the new rail going in.
The second photo shows the finished product with all nickel silver and an electrically isolated frog. The points are the same polarity as the running rail - no back to back wheel shorts, which caused me afew problems on the old layout.
So, five turnouts saved and reused in Herndon.

Working on the main line


Now that we have all the plywood down in Herndon, PA, we start on the roadbed. We pick up where we stopped up in the back, crossing the fork of the Susquehanna (you can see the white of the stone bridge in the top of the second picture). I then worked to integrate crossings from my previous layout to save time. I set them on top of the roadbed to be sure they fit the flow we laid out. Once the roadbed was nailed down, I laid some Upsome Board for the base of the town. that is the white material you see. I have not yet made the height transition between the main and the quarter inch lower siding on the Upsome Board.
While this was going on, I just put out some Atlas number 7 turnouts for the hidden area at the end of the line.
I cannot lay them until I finish painting the overhead structure which will be done this weekend. You can see if you look carefully, that I have put a side rail up on the overhead to protect against major disasters if a derailment occurs.
The next step on the main line will be to plaster in the shoulders of the ballast line and then paint that black. I have also superelevated the curves, using N scale cork roadbed as the base of the elevation change and transitioning up onto it with card stock. If you look carefully at the base of the roadbed on the curves, you can see the black cardstock and the brown N scale cork. I also use the black card stock to shim the joints on the homasote to try to make it even as their thickness tolerances are pretty sloppy in manufacturing that stuff. You can see it sticking out near the turnouts.