Wednesday, February 2, 2022

Trying to Finish Up Some Projects

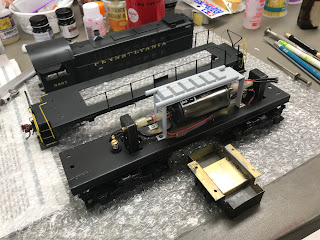
Well, I am trying to wrap up several diesel projects. This is a Car Works RS1 that I have added some details to, reworked the drive including a new tower gear and chain set up that I purchased from Des Plaines, and added four-wheel picks So, here are the parts in the project box. I have already painted the chassis, fuel tank and trucks. I have added decals, yellow handrails and etched builder's and trust plates. 
Now I have assembled the drive line. I had some problems as I did not recall the drive line layout exactly, but we worked through it. The mechanism works very smoothly. I had found that the earlier tower gear was not very smooth, and the new set up ran very well. I substituted NWSL Code 145 wheels in the trucks and they enhanced the overall appearance and operation. 

I am using tacked on wires to determine the polarity of the wiring that I will use so that red wires go to the red brush and black wires, the black brush on the motor. 

I coupled it up to another model that is awaiting painting, just to see it pull something. 

Next project is an Overland Alco S2 switcher that has been painted and had the lighting and crew added. It took me over two hours just to do the glass in the cab! When this model was produced, in 1985, Overland was adding simulated Prime movers. I painted it grey. It is an early end tower design and things are getting pretty tight under the hood!
 You can see I also added some lead weight in the battery boxes that are under the frame. 
Here we are, all assembled now and on the layout. It really looks good. I added a little weathering including some dust from the sanding around the trucks.
That extra weight really tells in the pulling capability of the engine. Gosh, I like how it looks!
So, with this and the RS1, I now have two early Alcos coming onto the layout. I like their looks a lot.


Sunday, January 16, 2022

A Project Completed! The Lathe is back in Service

Well, after the assembly was completed, I had to mount everything back on the lathe. So, first was the apron. You can see how it sits with the cross-feed gear sitting up above the apron to engage the cross gear. The lead screw has been re-attached so it is holding the apron in place.
Now, the saddle is in place and attached both front and back. The tail stock is mounted as is the collet holder. I have tested the various feeds and they work really well. I am very pleased with the lack of lag in the cross feed power assembly and the overall feel of the tool holder. 
Here is another view from behind the tail of the lathe. I am now debating opening up the head stock to see if I need to replace the lubrication wicks in that area. Maybe during the heat of summer when the basement is a great spot to be.
 

Saturday, January 15, 2022

Maintenance problems - A Lathe cross feed failure.

Well, a critical piece of equipment for me is my South Bend lathe. It was built in 1945 and delivered to a company in Boston. It had a relatively hard life and I found it in the backyard of a house in Falls Church, VA in about 1989. It was under a tarp and came with a small amount of tooling. I took the lathe home and then rebuilt much of it, adding some new used parts. In those days, I worked with a used equipment fellow up in New Jersey to get parts. Well, the lathe gave me good service until about 3 months ago when the cross feed drive clutch froze. Fortunately, I found a new used drive, in good shape, for a great price on eBay.  So, the next step was disassembly, which began with removing the saddle, tailstock and collet holder that mounted to the back of the lathe. So, here we see the lathe minus the saddle and apron, useless until I fix the drive. 

For an old machine, It still looks good. The ways have some nicks but it still maintains good accuracy when I use it with my 3C collets. 
Here is the apron in the process of being disassembled. The cause of my problem was a failure of the reservoir gasket which led to a loss of lubrication on the clutch and then a seizure of the shaft. It is amazing how many tools accumulate as you do some work on something!
Here is the saddle which is pretty clean after 10 years since the last cleaning. I had put in a new cross feed screw and nut coupled with a larger dial.
This is the tail stock which is set up for a quick closer and drill. It is a heritage of its harder working days. 
So, the lack of lubrication also led to accelerated wear of the worm drive gear. The old gear on the right shows that, in comparison the replacement gear, A significant loss of metal in the teeth of the old gear has occurred.  
I have almost gotten all the components off the chassis of the saddle now. I have also cleaned up the interior of it. You can see that someone in the past had added a new sleeve for the shaft that used the far right hole.

 Fortunately, the damage was confined the clutch assembly, and the worm gear,

Parts are accumulating but being cleaned as I go. 
This is the final array. The culprit of my problems was the large metal shield in the foreground that formed the back of the reservoir. The gasket failed. I hope I do not have any screws or other parts left over when I am finished with reassembly!
The bottom of the chassis casting, which looks like a big cavity, was where the half-moon metal shield mounted. If you look carefully, you can see the gasket outline. 
So, here we see everything cleaned up, new parts add, lubricated with a surface coat of oil, and back in place. All that is missing are the handwheel that mounts to the far right and the reservoir back.
Handwheel now in place
A cleaned up front view. 
A final back view with the reservoir in place as the back shield is mounted. Next step is to mount this on the lathe by threading it on lead screw, attach it to the saddle and see if it works!
 

Wednesday, January 5, 2022

Yet another basket case - SC&F ATSF Extended height boxcar

Well, I am a sucker for a challenge, and I really like this car. I have standard height version, a Precision Brass car that is based on an SP car, a Bx-15. I changed the wood door and brake system to match the ATSF prototype. So, I wanted a raised roof car and this is an excellent model by SC&&F. I did not save any views of what I started with, but the ladders were broken so I contacted the owner of SC&F and he forwarded me a new set of ladders! What customer service! It also had some broken parts that I was able to replace from my own stock. This is an overview of the car, and I am going to use a Morton roof walk rather than wood provided to make it more distinctive car. I am not going to attach the Morton walk until after the car is painted. Before I paint it, I have to buy decals from Protocal as the provided ones were gone. Fortunately, Norm had them in stock. 
The hardest part of the assembly is making the extensions of the ladders. That is why the ones the other fellow had were broken. I made up the jig shown in the instructions and was able to use it to make the ladder. I like the inverted dreadnaught end.
The end details were made using different brake parts than those provided with the kit. I kept the power brake but removed the platform. I did not change the retainer valve as I felt the work wasn't worth it. Also added a Yoder coupler pocket.

Grabs were changed to make them even and the corner steps fabricated. 
Cut lever was made up and air hose added. Platform supports are from Intermountain. 
Underbody detail was a soldered assembly that did not use the parts provided with the kit, rather used homemade brass levers. Why? I have no idea, but I used it and just had to realign the rodding. You can see the Yoder coupler pocket as well. 
So, the completed end awaiting painting. The brake platform will go on after painting as it is a galvanized part. 
In making the roof ready to install, I had to preinstall the roof end supports and corner supports so I could just glue it in after I paint the roof black. So, we have about 2 to three weeks to go as we await the decals.
 

Thursday, December 30, 2021

Bringing back a damaged car - a beat up NP War Emergency Boxcar

Well, Ted Schneff advertised he had a damaged Ultra Model NP car that he would sell. We talked and I decided to buy it, despite a couple of crushed ribs. They are terrific models. When I got the car, I found that all the stirrups, despite being indestructible engineering plastic, had been torn to pieces.
Fortunately, I had a set of the steps from Chooch that matched what Mike at Ultra Models had used for the steps. The mounting holes were in place, so I had any easy time installing new ones, until I came to the ladder corners
As the steps were underneath the ladder mounts, I had to gently pry them up to get the steps in. The paint on the ladders was already damaged from flexing as their mounts were broken too (this car had been through the wringer) so I did not add to my repair load. 
Then we came to the broken ribs. You can see that one is completely ripped out and the other was crushed.  The resin showed through clearly.
Here we see the step is now in place but I still have to fabricate new ladder mounts. 
The brake wheel was broken so I removed it and replaced it later with a Chooch casting. 
The paint was chipped all over and the roof grabs were gone
I used the remnants of the grab mounts as drilling guides to replace them with wire. 
My amazement continued when I took a close look at the trucks. One truck was an Intermountain but the previous owner had not figured out how to assemble it so put a wire through the bolster and side frame
You can see the wire clearly here
And here. He painted everything a rust color although most trucks are dusty and greasy. 
The other truck was a Red Caboose, also very rusty.
So, I assembled a set of Intermountain trucks and used my own machined wheels
I had added a deeper relief in the face to more accurately resemble RR wheels. They are also stainless steel so they are not attracted to magnetic ramps. 
Back to the roof grabs. Holes are now drilled.
Wire grabs added
Now for the touchy part that will make or break our project. I carefully filed the broken rib down until it had a rectangular opening. I pried up the crushed rib to match its previous location. Fortunately, it fit right back in place
I then looked for a matching piece of Evergreen strip to replace the top chord of the rib. 
Fortunately, I found I had a 0.060 wide strip that matched the chord perfectly. I added a 0.020 wide piece to the bottom of it to give me the Zee cross section I needed. 
Here are the two ribs now in place. I held them there with ACC.
The match looked pretty good.  I lightly sanded them to be sure.
The hardest thing about the car was the heavy weathering. I could not use any one paint color to match it. So, I made a palette of burnt sienna, roof red, burnt umber and some grimy black
Using micro brushes, I went around the car and repaired all the scrapes and mars in the paint. The ribs blended pretty well. If I do not point out the damaged area, one will not really see it. 
The car is almost layout ready
New brake wheel in place, paint chips covered. 
Roof grabs generally okay
Seem to match
Stirrups are a little dark but I could not overcome the black totally. 
Ladders are generally blended back.
So, you really can't tell. I used a little chalk to whiten the repaired rib to match the balance of it. 
And I have now painted the trucks. I have to clean the treads and paint the wheel faces a greasy black to finish. So, hopefully tomorrow the car joins the roster. I now have another kit of this car to either sell of build. What a choice!