I have a scratchbuilt C1 by Frank Miller that he made from my drawings and research. We used a USH mechanism and added a new boiler to substitute for the oversized one that came from Japan. I have painted it and weathered it and now am, trying to get it completed.
The boiler front has an etched plate done by Ted Stepek who has passed away. I turned the reflector from aluminum. I now need to add the 1.5 volt bulb and glass on the headlight.
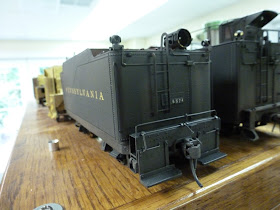
The tender is a Key model from their H8, 2-8-0, that is the same tender used behind the C1. I painted and weathered it as well.
It needs a reflector in the headlight (you can see it on the ground next to the tender), engine numbers on the side panels of the headlight, headlight glass and marker lenses. It seems the final steps take forever as you are so afraid of chipping paint!
The mechanism has been painted as well and I have added the wiring for the tender and the headlight.
Here is the circuit for the constant lighting of the micro bulbs. I have to fabricate a few of these as I am trying to complete a couple of engines. One is already in the tender and works fine.
Parts in place and ready to solder
Trimmed and soldered and ready for hook up.
Compact so it should fit in the boiler above the gearbox. It is about 2 inches long by 3/4 inch wide.
Sunday, July 23, 2017
Continuing with the bridge
Well, while the guys were working on the rosin paper in Crowl, Alan and I, later joined by Rich, worked on setting abutments for the bridge over the aisle. We did a lot of measuring and then re-measuring to set the height of the abutment by Shamokin. You can see we have a problem with the abutment being a bit wide so it sticks out slightly, over the edge of the fascia. We cut the road bed so there is no going back now. The track is now severed. Unfortunately, it appears it will take more work than I expected plus I have to add two turnouts to the line leading to the bridge.
I will need to make a small trim piece to hold the end of the abutment. I am thinking I can make a retaining wall on this side from RR ties - sort of cribbing.
Now we have to set the exact location and height of the main abutment for the other end of the bridge - that big concrete one you saw previously. It is going to barely fit inside of the main line. It has been suggested that I make a full scale template for the bridge. I think I need something more elaborate to help set the height as well. More on that later.
The Crowl area gets plastered
Well, last Monday evening the guys came over and one crew consisting of Paul, Phil and Kim put up the red rosin paper which is the underlayment for the plastering of the area.
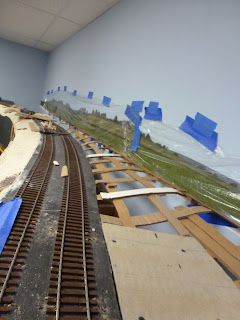
They glued the rosin paper to the webbing and it showed us the contours we had created by the way the webbing was installed. Here we are looking at the base for the Shamrock tank.
This is the long view to the end of the scene. The glue gun is what we use to glue the paper down.
Here is a view back towards the Crowl store. It illustrates how we are trying to have a slight rise in the scenery in front of the base of the photo to hide the seam of the 3 dimensional scenery with the 2 dimensional photo.
A distance view that meets our idea of what we wanted.
The base shown is for the Crowl store and the road in front of it which turns and goes away from the viewer. It is the raw cardboard that you see. It will be finished last, once the ground contours are in place.
Now I am covering the track completely with tape and newspaper to protect it from the plastering.
I carried on with the cover through the whole area.
Now I am starting to put on the first coat which is the plaster cloth. I put down a double layer of cloth for strength. A cut sheet sits in front of the water bottle. I cut the sheets with a paper cutter to make it easy.
Looking back to the joint with the previously completed scenery. It is pretty easy to integrate them together.
Plaster is now all in. The whole process took me an afternoon last Saturday.
The scene is looking more complete now.
You can clearly see the road heading to the right.
A distance shot that looks okay.
A closer view and it still looks okay so I am pleased. Now for the cover coat of stucco compound.
Thursday, July 6, 2017
Building the Crowl Area
Well, you have seen the backdrop go up. Now we have to add the topography that will integrate it into the scene. I put plastic over the picture to protect it from plaster, etc. The basic land form is to have a road coming up onto the layout near the glue gun, turning right and disappearing behind the hill on the far right. This is to simulate Crowl where there was a store and a road curving in front. So, this is our first attempt.
I have been having problems with less costly blue tape as it does not hold the plastic over the picture and then the plastic sticks to itself and I have a mess rather than a cover. You can see the tape and the plastic lying on the webbing. Aggravating to say the least.
Paul C. had some good burns on his fingers from the hot glue and I joined him the other day with burns as I worked to complete the area. I cut the width of the road back and it balanced the scene a little more. The tape failed once more so I went out and bought 3M tape.
The new road shape is more pleasing and the structure is more rigid so I am pleased. It is only a two lane country road so the width, at 5 inches is appropriate.
The new tape holds well also.
The homasote to the right is the base for the general store. The webbing continues to bridge the gap to the wall. I want a slight rise with a drop just as the land gets to the picture to hide the seam.
The track gets real close as we go along so I have to make a small hump to get the effect I would like. A little more pronounced than before but manageable.
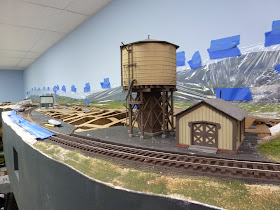
So, here we are back at the start of the scene with a perspective that is a little lower. The hill looks about right and the road disappears as desired. This is the Shamrock Tank. We are about 22 feet to the back wall.
The general store is in the distance. The helpers would tie up here and then go up for water at the tank at Shamrock, leaving the train at the store - called Crowl.
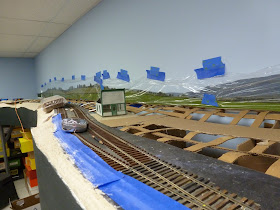
Further down the line, the hill base looks good relative to the track. This will be wooded when we are done.
Now to the last section. I am going to extend the base of the town (you can just see it above the glue gun) out to the right and close to the wall with the photo. Then I will plant a grove of trees to mask the end of the picture. I will also paint some backdrop trees on the back wall going to the left. It will become blocked by some large building that is yet TBD.
Preparing the Main Pier
Well, the bridge we are making will go over the main aisle so it has to be high. You can see that the pier that we are going to use is really tall. Alan B. our resident woodworker made it to the dimension we specified by putting about 6 pieces of pine scraps together and then planning it to a taper on all four sides. He did a great job.
I put three coats of sanding sealer on it, sanding between each coat, to eliminate any grain. It came out looking beautiful as a piece of wood.
It reaches all the way up to the upper deck! I had to use the edge of the yard as a work space so I could paint it.
Now we have moved to the spray room. I have it balanced on my sand blasting cabinet in front of the spray booth.
First we will prime it and then we will paint it with Floquil Aged Concrete. I think I will weather it once it is placed.
It has been prime with Tamiya light grey to we took the grain out of the picture.
Nice an even coat that dries quikly. I used the spary can for this one.
Now the aged concrete color goes on. Took a couple of coats.
Looks pretty even.
The top is offset as the through truss deck is not at the same height as the deck girder.
I placed it at the location where it will be used. The height looks good. I hope no trimming is required! The next step is to cut out the 2X4 and the temporary deck.
It is going to be pretty imposing when you enter the room and see the bridges here. I can't wait to finish the hill side!


